
Chocolate Chip Cookie Cake Recipe: Two Methods And Timings
A chocolate chip cookie cake recipe can go one of two ways. Choose the quick, thin version when dessert needs to be baked today. Choose the thick, chilled version when taller slices and advance preparation matter more.
Both methods make a homemade chocolate chip cookie cake that can be cut into 12 slices. The quick cake uses melted butter, mixes by hand, and bakes in 12 to 14 minutes. The thick version uses creamed butter, needs at least one hour of chilling, and bakes for 20 to 25 minutes. Those methods are not interchangeable, so decide which texture and timeline fit the occasion before gathering ingredients.
The quick cake takes about 22 minutes before cooling and decorating, while the thick recipe’s listed 40-minute total does not include its one-hour chill. The timing and yield come from Design Eat Repeat and Well Plated. Plan on at least 1 hour and 40 minutes for the thick version before it is ready to frost.
Choose the chocolate chip cookie cake recipe that fits your day
Choose this method What to expect Pan and timing Quick and thin Melted butter, hand-mixed dough, soft and chewy center Greased 11-inch metal pan, 350°F for 12 to 14 minutes Thick and chilled Creamed butter, taller slices, make-ahead dough Use the pan specified in the linked recipe, 350°F for 20 to 25 minutes after chilling
The quick version is the simpler cookie cake from scratch. The dough spreads into a half-inch layer, and the cake should look lightly browned but slightly underbaked when it comes out. The thick chocolate chip cookie cake is the better choice when a bakery-style shape and taller slices are the goal, but it needs more planning. These details come from Design Eat Repeat and Well Plated.
A clear glass dish can be used for the thick version at 325°F, according to Well Plated. The pan and temperature should match the method selected. Avoid moving either dough into an unfamiliar pan and assuming the same bake time will work.
Gather the ingredients and equipment
For the quick version
The quick dough uses:
- ½ cup unsalted butter, melted
- White sugar
- Light brown sugar
- One egg
- Vanilla extract
- Baking soda
- Baking powder
- Flour
- 1 cup semisweet chocolate chips
The recipe divides the chocolate chips into two portions, with ½ cup chopped and ½ cup left whole. The complete measurements for the sugars, flour, leaveners, egg, and vanilla are in the quick cookie cake recipe.
You will also need:
- An 11-inch metal round pan, or a 9-by-13-inch metal pan
- Butter or cooking spray for greasing
- A microwave-safe bowl
- A mixing bowl
- A whisk or sturdy spoon
- A cutting board and knife
- A wire rack
- A spatula
- A mixer and piping bag if decorating with buttercream
The quick dough mixes in one bowl by hand. A mixer is useful for the frosting, but not necessary for the cookie cake itself, as Design Eat Repeat notes.
For the thick version
Use the full ingredient list and measurements from the thick cookie cake recipe. This method relies on softened butter creamed with sugar, followed by the remaining dough ingredients and chocolate chips.
Have a mixer or sturdy hand mixer ready, along with a flexible spatula for scraping the bowl. The finished dough also needs plastic wrap or another way to cover it while it chills. Do not move this dough into the quick recipe’s pan and timing. It is designed for a thicker result and a separate chilling step.
Make the quick, thin cookie cake
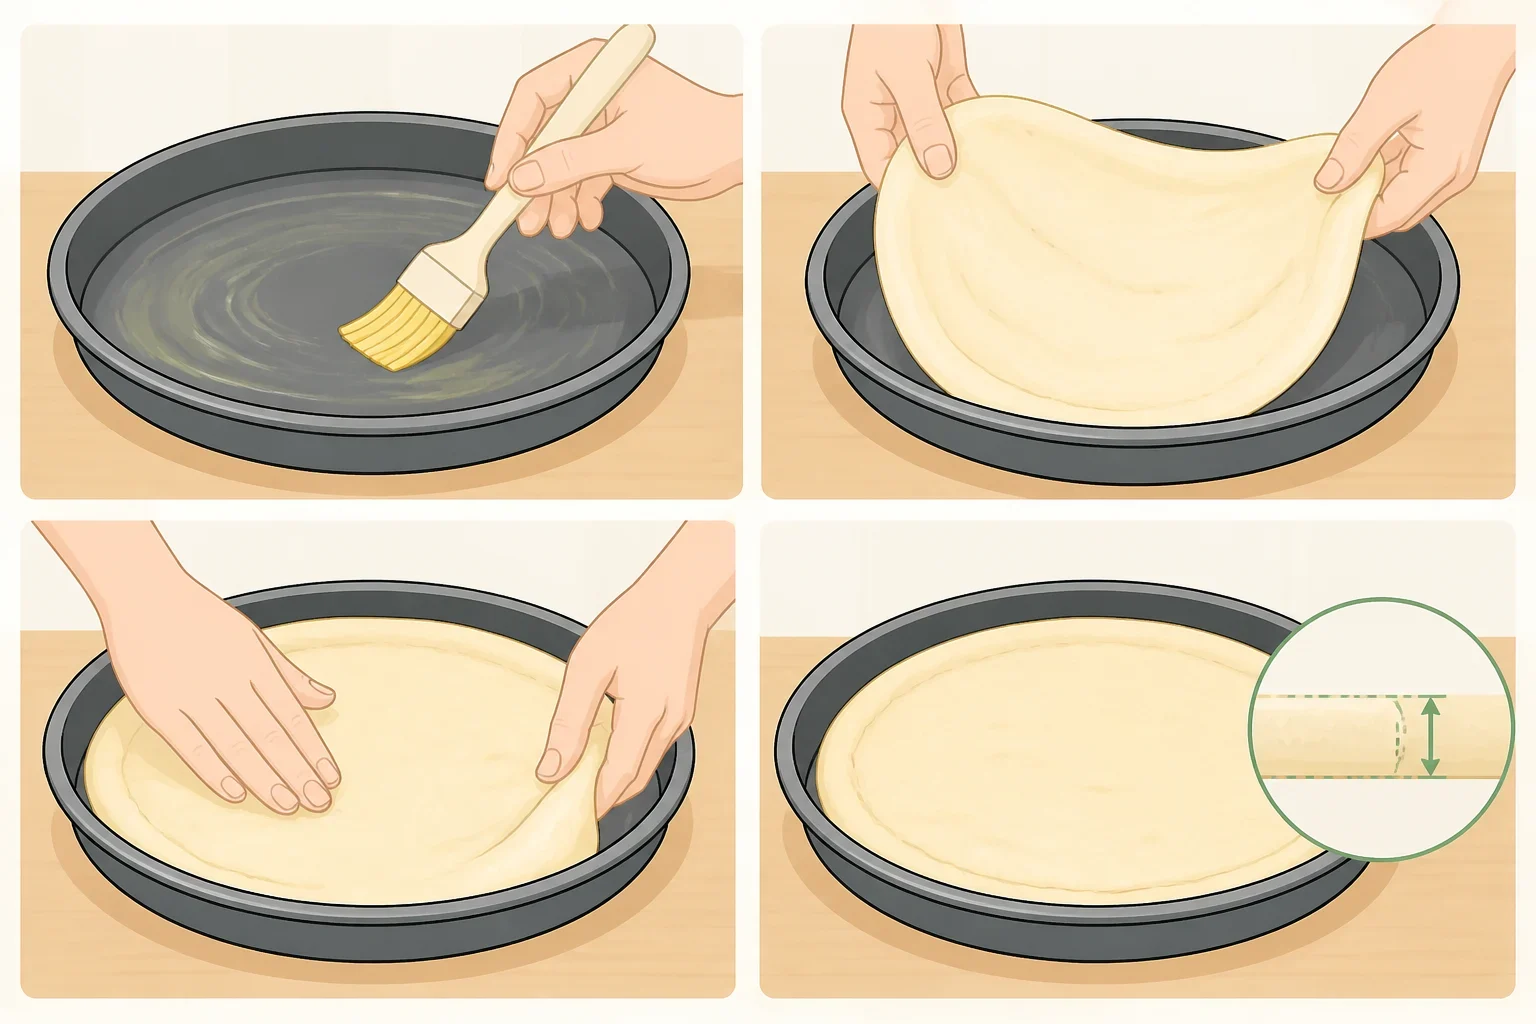
1. Preheat the oven
Set the oven to 350°F. Grease an 11-inch metal round pan. The source recipe also identifies a 9-by-13-inch metal pan as an option, but its bake time and visual cues are tied most closely to the 11-inch pan. Follow the recipe’s pan guidance if using the larger pan.
The tested method uses a greased pan. Do not substitute an unfamiliar pan or assume that lining it will produce the same result.
2. Chop half the chocolate chips
Place ½ cup of the chocolate chips on a cutting board and chop them into small pieces. Set the remaining ½ cup aside.
The chopped pieces distribute chocolate more evenly through the dough and help the finished cake cut more cleanly. This is a small step, but it makes a difference when the cake needs neat slices, as Design Eat Repeat explains.
3. Melt the butter
Place the ½ cup unsalted butter in a microwave-safe bowl. Microwave it for 20 to 30 seconds, just until liquid.
The butter should not be piping hot. If it is very hot, let it stand briefly before mixing it with the egg. The source recipe gives the same melting window and cautions against overheated butter.
4. Mix the wet ingredients
Pour the melted butter into a mixing bowl. Add the white sugar, brown sugar, egg, and vanilla. Stir by hand until combined.
There is no need to bring out a stand mixer for this dough. Scrape the sides of the bowl so the butter and sugars are incorporated evenly.
5. Add the dry ingredients
Stir in the flour, baking soda, and baking powder. Stop mixing as soon as the dry ingredients disappear. Fold in the chopped and whole chocolate chips.
Do not taste the raw dough. UF/IFAS Extension advises against eating raw dough or batter, and the source notes that baking is the step that makes the mixture safe to eat.
6. Press the dough into the pan
Transfer the dough to the greased pan. Press it into an even layer about ½ inch thick, following the quick-method instructions.
That depth is central to the quick method. If the dough is piled thicker in the middle, the edges may brown before the center is ready. Smooth the surface with a spatula or lightly damp fingers, taking care not to create a thick ridge around the outside.
7. Bake until lightly browned
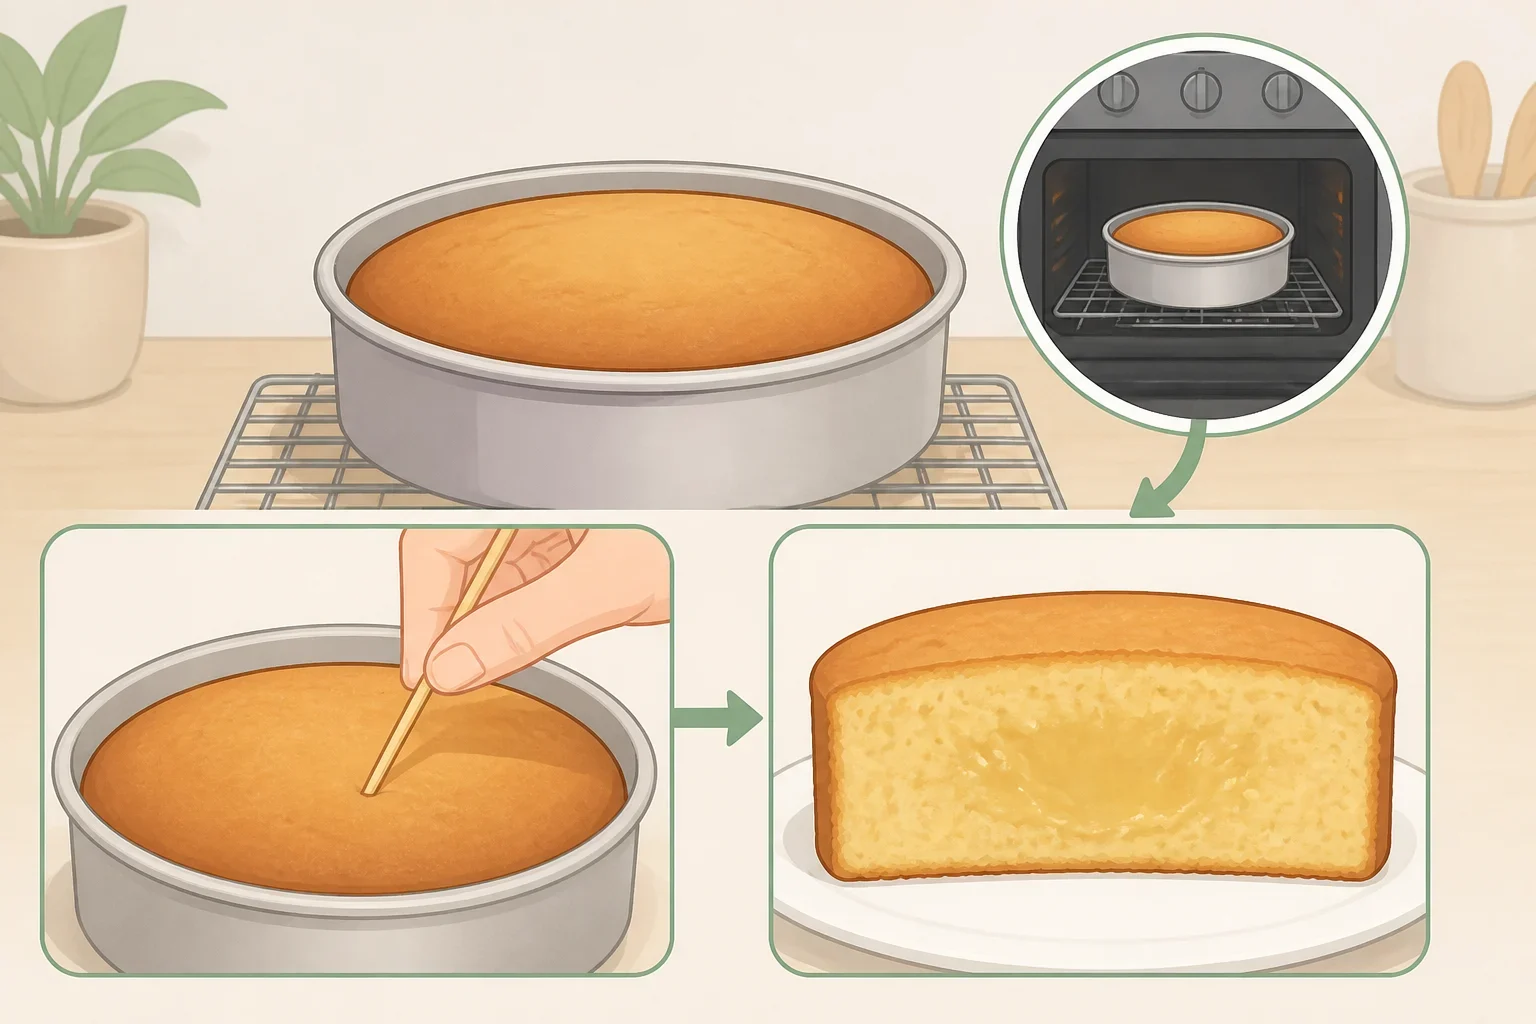
Bake at 350°F for 12 to 14 minutes. Begin checking at 12 minutes.
The top should be lightly browned and still look slightly underbaked in the center. For this thin, quick method, that appearance signals a soft, chewy center rather than a raw one. The cake will continue to firm as it cools. Pulling it before the center looks fully set also helps prevent a dry result, according to the recipe instructions.
8. Cool completely
Place the pan on a wire rack and let the cookie cake cool completely before removing it or adding frosting. A warm cake can cause frosting to slide or melt, and it is more likely to break when transferred.
Once cool, run a sharp knife around the edge. Serve the cake directly from the pan or loosen it carefully and move it to a serving dish.
Make the thick, chilled cookie cake
The thick version is a separate recipe, not a shortcut variation of the quick dough. Its one-hour chill is part of the method, not optional planning time.
1. Soften the butter
Bring the butter to a soft, workable texture before creaming. The complete ingredient list and mixing directions are in the thick cookie cake recipe.
Butter that is too firm will be difficult to cream evenly. Butter that is overly warm can make the dough difficult to handle. Aim for butter that yields when pressed but is not oily or melting.
2. Cream the butter and sugar
Beat the softened butter with the sugar according to the thick recipe’s directions. Pause as needed to scrape the bowl with a flexible spatula, then continue mixing until the mixture is evenly combined.
This dough should not be pressed into the pan immediately. The thick method depends on chilling, which is why it takes longer than the melted-butter version.
3. Finish the dough
Add the remaining ingredients in the order specified by the recipe. Mix until the dough comes together, then fold in the chocolate chips.
Cover the finished dough before chilling. If the dough is not covered, it can dry out or pick up odors in the refrigerator.
4. Chill for at least one hour
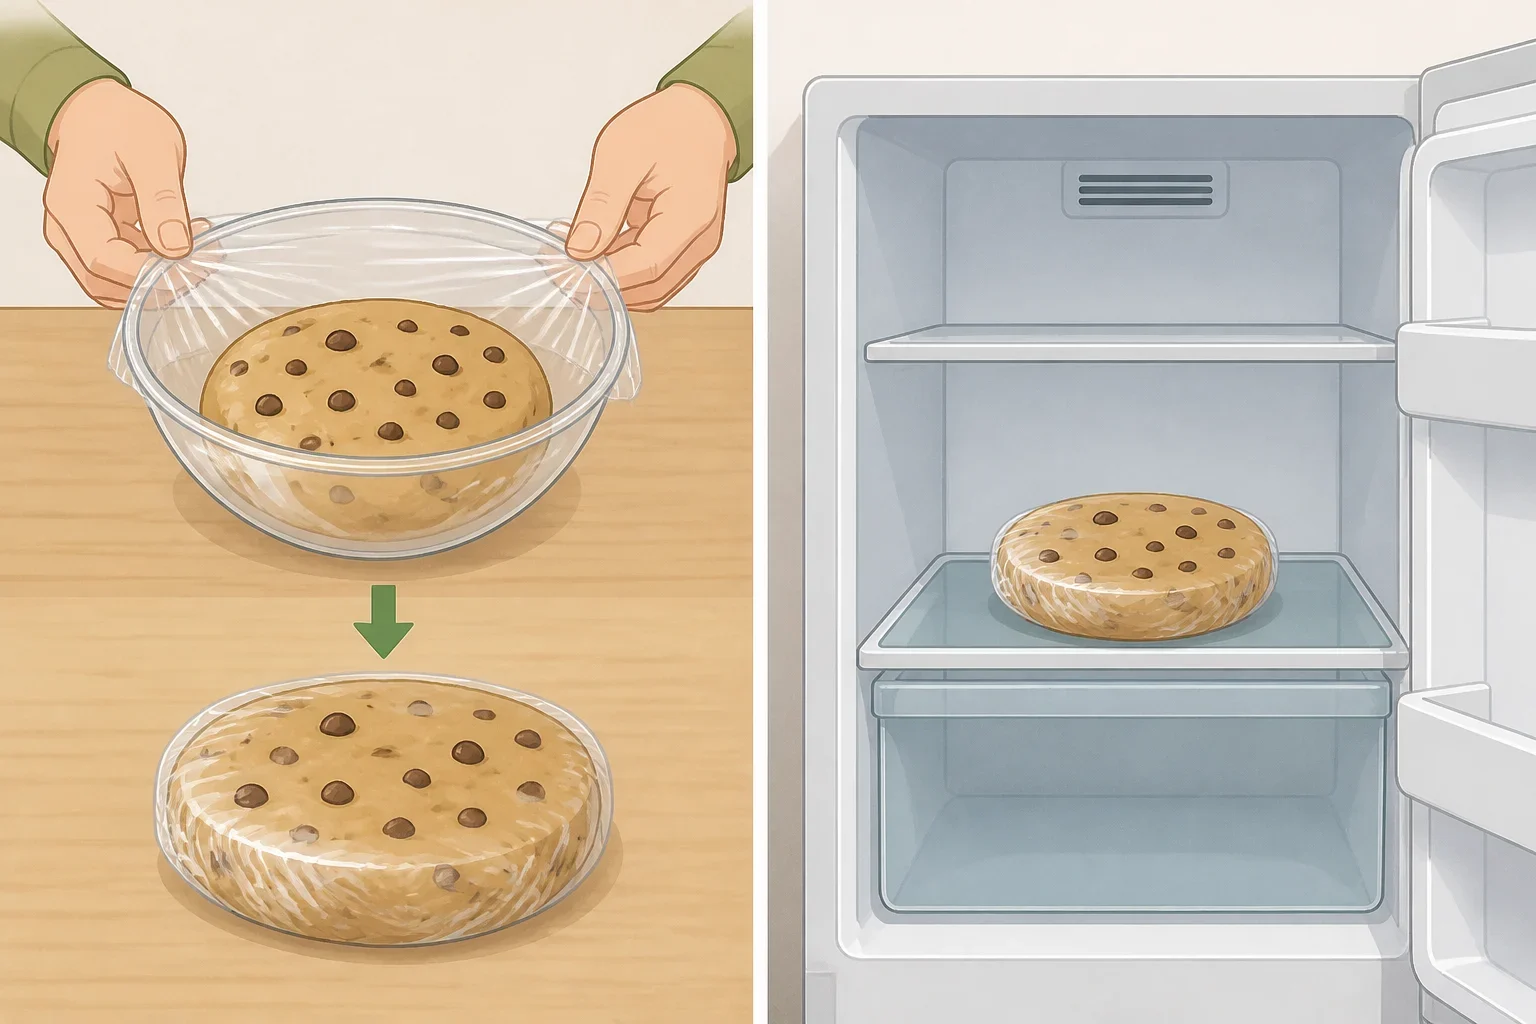
Cover the dough and refrigerate it for at least 1 hour. It can be refrigerated for up to 3 days or frozen for up to 3 months, according to Well Plated’s make-ahead directions.
The listed 40-minute total does not include this chill. Treat the refrigeration period as additional time when planning for a birthday or gathering.
5. Press the chilled dough into the pan
After chilling, press the dough into the pan specified by the recipe. Work it into an even layer rather than leaving a mound in the center or thin spots along the edges.
If using a clear glass dish, set the oven to 325°F. Otherwise, preheat to 350°F. These temperature directions come from Well Plated.
6. Bake and check the center
Bake for 20 to 25 minutes. Check the cake at the 15-minute mark.
The top should be lightly golden, and a toothpick inserted in the center should come out clean. If the edges are browning faster than the center, loosely tent the cake with foil for the rest of the bake. Remove the pan to a wire rack and let the cookie cake cool completely before frosting or slicing.
Decorate and store the cake
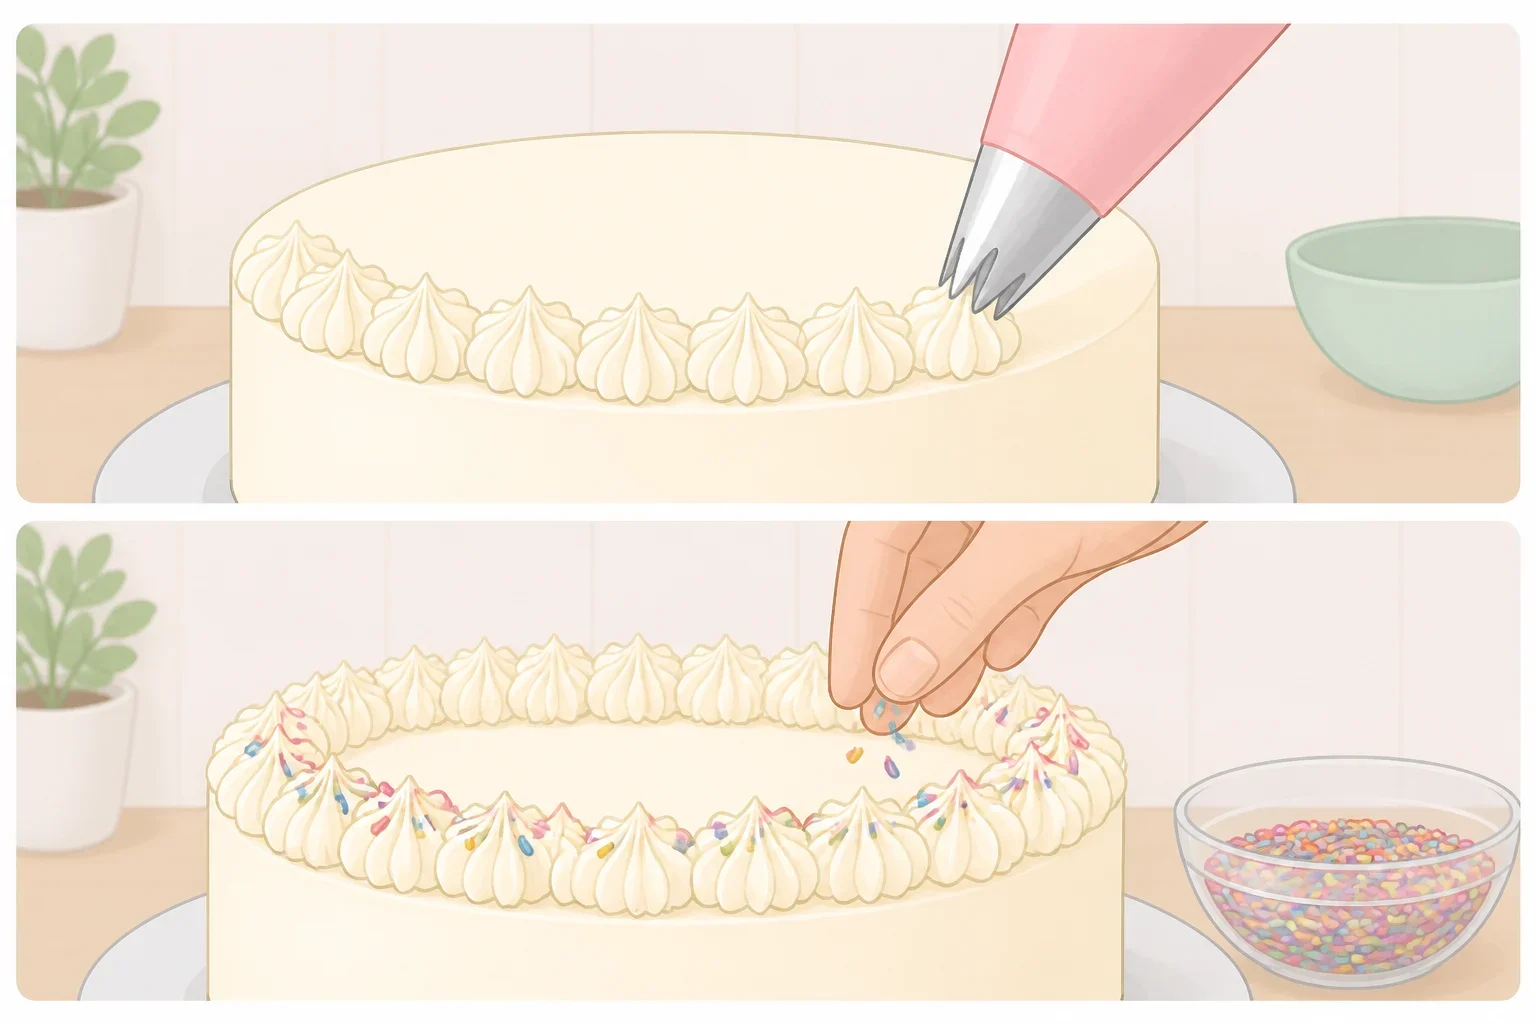
For a simple buttercream finish, pipe a border around the cooled cake with a large star tip. Add sprinkles immediately. The frosting begins to form a crust soon after it is made, so sprinkles may not adhere as well if decorating is delayed, according to Design Eat Repeat.
A border uses less frosting than a written message. Double the frosting recipe if the cake also needs lettering such as “Happy Birthday.” The linked frosting recipe uses softened butter, powdered sugar, vanilla, salt, and 1 to 2 tablespoons of milk, then beats the mixture until it is creamy and pipeable.
For storage, keep an unfrosted cake covered at room temperature for 2 to 3 days, following Design Eat Repeat’s storage guidance. The source’s one-day room-temperature guidance applies to its homemade buttercream. It should not be extended automatically to every frosting.
Cream cheese frosting, whipped cream frosting, and cut fresh fruit toppings need different storage handling. Keep those higher-moisture toppings refrigerated rather than treating them like a basic sugar-based buttercream.
Choose the method that fits the day
Bake the quick version when the celebration is today. It mixes by hand, needs no chilling, and gives a soft, chewy cake after a 12-to-14-minute bake, followed by cooling and decorating.
Chill the thick version when taller slices or advance preparation are worth the extra time. Its dough can be prepared up to 3 days ahead, then pressed into the pan and baked when needed, according to Well Plated.
The practical choice is simple: use the quick method for same-day baking, or choose the thick, chilled method when a bakery-style result and a little planning make sense.
