
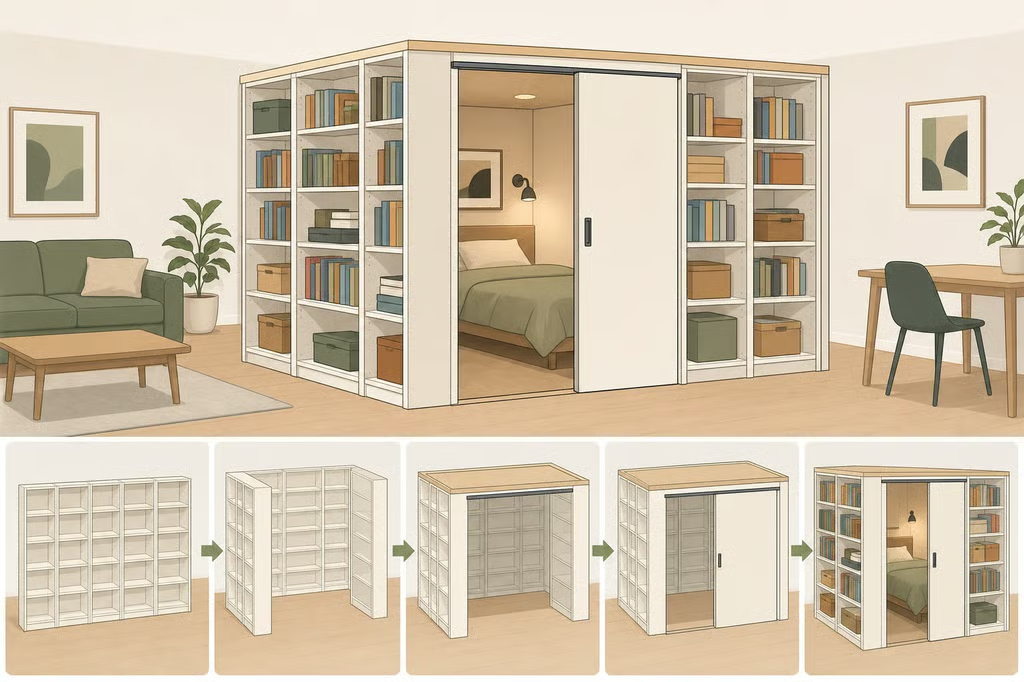
- IKEA BILLY room divider hack: How to decide if it fits your studio
- Understand what the BILLY enclosure can and cannot do
- Check the room before buying anything
- Price the full scope, not just the bookcases
- Choose the finish before assembly
- Choose the right version for the apartment
- Finish the feasibility check before shopping
IKEA BILLY room divider hack: How to decide if it fits your studio
The IKEA BILLY room divider hack can turn one open studio into separate zones for sleeping, working, and relaxing. The most ambitious version is designed as a room within a room, using bookcases as enclosure walls and a sliding door as an actual entrance.
That sounds like the answer to every small-space problem until the tape comes out. Before buying bookcases, measure the full footprint, check windows and vents, review the lease, and decide whether the goal is visual privacy or a legally separate bedroom. A shelf wall can make a studio feel calmer and more private, but it does not automatically provide soundproofing, independent climate control, or code-compliant egress.
Understand what the BILLY enclosure can and cannot do
A typical IKEA BILLY bookshelf room divider separates two areas while leaving the room visually open. It can create a boundary between a bed and a living area, or between an entryway and the rest of a studio, without requiring a full construction project.
An enclosed arrangement asks more of the furniture. The bookcases need to create a stable shape, the entrance needs to function, and the surrounding room still needs usable circulation. The result may feel like a private bedroom, but the enclosure remains part of the original studio unless local authorities recognize it as something else.
That distinction should shape the project from the beginning. If the main goal is to keep the bed out of sight during the day or make sleeping feel less exposed, the idea may be worth exploring. If the goal is a room with guaranteed sound control, separate ventilation, or a new required exit route, bookcases and a sliding door may not be enough.
The practical benefit is privacy and storage. The trade-off is that a large enclosure takes up more floor area than a single shelf wall and introduces more questions about stability, access, and installation.
Check the room before buying anything
Treat the feasibility check as the first step, not an item to handle after delivery.
1. Mark the proposed footprint
Use painter’s tape or removable markers to outline the enclosure on the floor. Include the bookcases, the door opening, and the space needed to walk around the outside.
Measure:
- The full length and width of the proposed enclosure
- The ceiling height
- The entrance and door movement
- Walking paths around the structure
- Nearby doors, drawers, and windows
- The route needed to bring the furniture into the apartment
Do not measure only the furniture. A layout that technically fits may still make the studio difficult to use. Stand inside the taped outline and look at the bed position, storage access, and route to the apartment’s main door. If the taped version already feels cramped, the finished project will not create extra breathing room.
Check the floor as well. Uneven flooring can affect how several units sit together and how a track operates. The featured project’s creator recommended precise measurements and described using plywood to raise some bookcases where sloped flooring caused problems. That kind of workaround belongs to the specific apartment where it was used. It should not replace proper leveling, stabilization, or installation guidance.
2. Trace every window, vent, outlet, and exit route
Mark windows, heating and cooling vents, outlets, and the route to the apartment’s main door. Then check whether the proposed walls would block, cover, or make any of them difficult to use.
A sleeping enclosure should not turn the only window into an unreachable one. It should not interfere with airflow or leave outlets hidden behind furniture. Keep the exit route clear and easy to use, including at night.
The exact requirements depend on the apartment and local rules. A landlord, local building department, fire-safety authority, or qualified professional can explain what applies. Do not assume that a sliding door makes the space a legal bedroom. A decorative or freestanding divider and a permitted room addition are different projects.
3. Review the lease before planning attachments
Tall furniture needs a stability plan. Read the current manufacturer instructions for the bookcases and sliding-door system before deciding where the structure can sit or how it can be attached.
Confirm:
- Whether the bookcases need anti-tip attachments
- What surfaces can support the door track
- Whether the planned arrangement is compatible with the installation instructions
- Whether wall or floor attachment is required
- Whether the lease permits those attachments
A project can be freestanding in the sense that it is not a newly built wall and still require attachment for stability. Ask the landlord for written permission before drilling into a wall or floor. If the structure, track, or attachment points are unclear, stop and consult a qualified installer.
Do not copy a photo as an installation plan. If the available project reporting does not explain how the enclosure was anchored, that missing information matters. The safest version is the one that follows the current instructions for the actual products being installed in the actual apartment.
4. Decide what the divider needs to accomplish
Write down the job the project must do. A useful list might include:
- Hide the bed from the main living area
- Create a stronger visual boundary
- Add storage
- Make the studio feel less exposed at night
- Preserve access to windows, vents, and outlets
Then write down what it does not need to do. If soundproofing, independent temperature control, or legal bedroom status is essential, a bookcase enclosure may be the wrong solution.
That decision prevents an expensive mismatch. The IKEA BILLY studio apartment divider can improve the feeling of separation without solving every limitation of an open floor plan.
Price the full scope, not just the bookcases
The project budget should include more than the shelves. Make a list before shopping:
- Bookcase units
- Sliding door and track, if the design includes one
- Stabilization and attachment materials required by the instructions
- Leveling materials for an uneven floor
- Delivery or moving costs
- Paint, trim, cabinet doors, or other finish materials
- A back-panel treatment, if the rear faces will be visible
- Installation help, if the attachment or track work is beyond the available skill level
A raw version may be less expensive and faster than a built-in-looking version, but the unfinished choice still has design consequences. The backs of the bookcases may face into the sleeping area or the main room. Seams, thin panels, and mismatched surfaces can become more noticeable once the furniture forms an interior wall.
Set aside room in the budget for changes discovered during measuring. A sloped floor, an inconvenient outlet, or a door opening that needs to shift can change the materials required. The project should not depend on using the cheapest possible interpretation of every step.
Choose the finish before assembly
The unfinished version is the simplest place to start. It can provide storage and visual privacy without adding paint, trim, cabinet doors, or extra framing.
That does not mean finishing work can be added without planning. Decide early whether the enclosure will remain simple or become a more custom-looking installation.
Keep the IKEA look
Leaving the units unpainted and untrimmed keeps the scope narrower. It also makes later changes easier to reconsider. This option may suit a renter who wants the storage and privacy without committing to a more permanent appearance.
Before assembly, still plan how the backs will look and where the seams will land. A visible rear panel is part of the room’s appearance once the bookcases form an enclosure.
Add doors and trim later
Cabinet doors can make the exterior look more finished, but they add hardware, weight, and opening clearance. Trim can hide seams and make separate units feel more unified, while also changing the enclosure’s final dimensions.
The order matters. If trim is added after the structure is positioned, nearby walls, windows, or doors may no longer have the same clearance. Decide which surfaces need finishing before buying materials.
Cover visible backs carefully
An earlier BILLY divider project used grasscloth on the bookcase backs, with peel-and-stick grasscloth suggested as a less time-consuming alternative. That idea may help with appearance, but it is not automatically suitable for every surface or rental. Test the covering first and check whether removal could damage the finish.
The backs should be treated as a separate finish surface, not assumed to look like cabinetry. A fully finished BILLY project documented by The Bertrand Family included framing, paint, doors, and additional trim, and took several months of occasional Saturday work. That was a fixed-wall built-in, not a freestanding studio enclosure, so its timeline is a useful reminder about scope rather than a promise for this project.
Choose the right version for the apartment
The IKEA BILLY bedroom partition hack is worth exploring when:
- The taped footprint leaves a comfortable walking route.
- Windows, outlets, vents, and exits remain accessible.
- The ceiling and entrance work with the selected furniture.
- The lease permits any required attachments.
- The current installation instructions support the planned arrangement.
- The budget covers the full scope, not only the bookcases.
- Visual privacy and storage are the main goals.
Choose a simpler divider when the room is too tight, the lease does not allow attachment, or the installation details cannot be confirmed. A curtain or folding screen can create visual zoning with less commitment. A wardrobe divider may add storage, though it may not provide the same enclosed feeling as a door-equipped room within a room.
The simpler option is also easier to change if the studio’s needs shift. A sleeping area that works for one season may need to become a workspace, nursery corner, or open living area later. Reversibility has real value in a rental or a small home.
Finish the feasibility check before shopping
The next step is not loading six bookcases into a cart. Tape out the complete footprint, measure the clearances, trace every window and vent, check the exit route, and review the lease. Then read the current installation requirements for the furniture and door system.
If those checks pass, decide whether the unfinished IKEA look delivers enough privacy and storage. Add trim, paint, doors, or back-panel treatments only after the basic layout works.
If the measurements, attachment rules, or safety questions do not line up, choose a curtain, screen, or other reversible divider instead. The best IKEA BILLY room divider hack is not the most elaborate one. It is the version that fits the apartment without making everyday life harder.
