
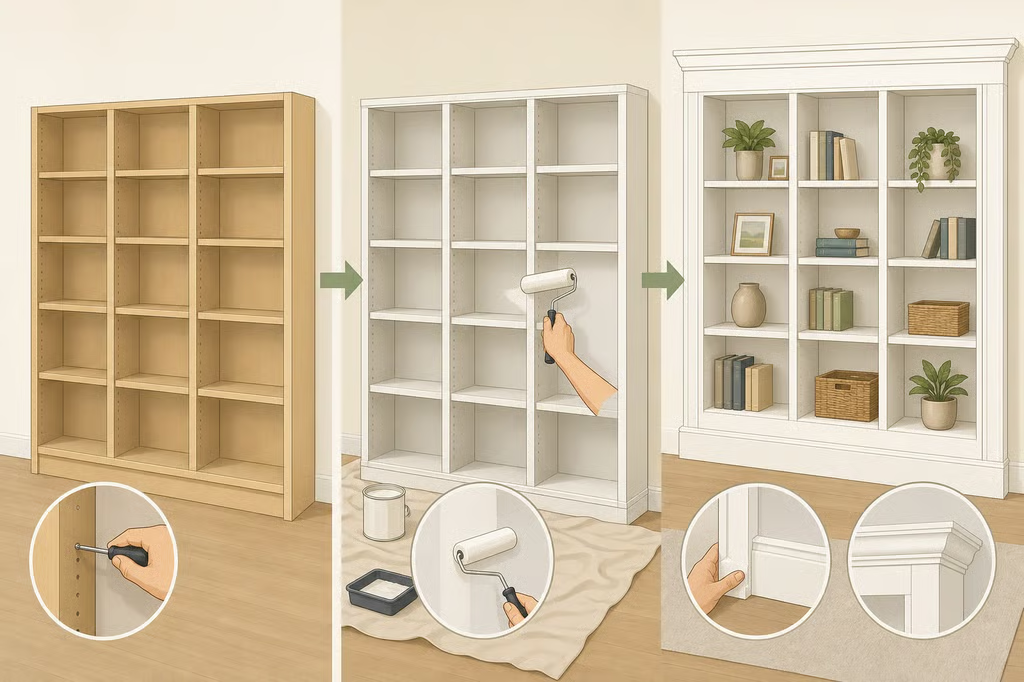
- DIY IKEA shelf hack that looks expensive: Built-in style
- Check the space and lease before you shop
- Choose the finish path
- Gather the materials and tools
- Prepare the panels before painting
- Assemble and level the bookcase
- Add trim for the built-in look
- Anchor the unit before loading it
- Decide whether the project is a refresh or a built-in
- Complete the final safety check
DIY IKEA shelf hack that looks expensive: Built-in style
A plain IKEA shelf can look far more considered when it fits the wall properly, has a coherent finish, and does not wobble under a few books. This DIY IKEA shelf hack that looks expensive walks through the decisions that matter most: measuring the space, choosing between a built-in look and a furniture-style finish, preparing the surface, adding trim, and planning the wall attachment before the shelf is loaded.
The project is not a substitute for custom cabinetry. Trim can cover visible gaps, but the finished piece remains a modified freestanding bookcase. That distinction matters if the wall is uneven, the lease limits drilling or painting, or the shelf cannot be attached securely.
A useful design principle comes from a renovation covered by Architectural Digest two days ago. Julianne Moore’s design team kept the apartment’s layout, simplified the rooms, added storage, and worked with existing lacquered bookcases instead of removing them. Apply the same idea at a smaller scale: solve the actual storage gap before buying more furniture.
Check the space and lease before you shop
Start with a tape measure, pencil, painter’s tape, and a level. Measure the wall in several places rather than assuming the ceiling, floor, and side walls are perfectly straight.
Record:
- The narrowest wall width
- The available height from floor to ceiling or the underside of a ledge
- The maximum depth that will not block a walkway, door, outlet, or heat source
- The location of baseboards, crown moulding, outlets, switches, and vents
- Any change in width from the floor to the upper part of the wall
Use the narrowest width when deciding whether a unit will fit. Leave room for the baseboard and the trim you plan to add. A bookcase that fits between two walls but cannot sit flat because of a baseboard needs a different plan, such as removing, notching, or working around that trim. Do not cut until the unit’s instructions and the existing wall details have been checked.
For a product-specific starting point, compare the dimensions, finishes, availability, and price of the unit in IKEA’s BILLY listings. Do not assume that a different height or finish has the same dimensions or hardware. Record the exact model before buying paint or designing the trim.
If drilling into the wall or repainting surrounding trim is not allowed, plan for a furniture-style finish instead. A removable anti-tip strap may be an option, but it still needs to be appropriate for the wall, the unit, and the manufacturer’s instructions. Permission to install something does not make an unsuitable attachment method safe.
Choose the finish path
There are two practical versions of this project.
A built-in-style bookcase is painted to coordinate with the wall, fitted with trim, and attached to the wall. This is the more convincing luxury-looking IKEA shelving DIY, but it also involves more measuring, cutting, filling, caulking, and permission to alter the room.
A furniture-style shelf is finished as a standalone piece. It may be painted to suit the room, but it does not use wall-matched trim to disguise every gap. This option is easier to reverse and may be more appropriate for a rental.
Neither choice is automatically better. A homeowner may prefer a freestanding finish for flexibility, while a renter with written permission may be able to create a more permanent look. Decide before purchasing trim, paint, or installation supplies.
Build a simple project budget
A realistic budget includes more than the shelf itself. Write down the cost of:
- The IKEA unit
- Primer or surface-preparation products
- Paint and application supplies
- Sandpaper and a clean cloth
- Trim or moulding for the built-in path
- Wood filler and paintable caulk
- Screws, anchors, or attachment hardware specified for the wall
- Replacement knobs or pulls, if the unit has doors or drawers
- A level, stud-finding method, or other tools that are not already available
The total is your project budget. If trim and wall repair push the price beyond what the room can support, a careful furniture-style finish may be the better choice. A cheap IKEA shelf hack only stays cheap when the materials, tools, and possible repair work are counted before construction begins.
Gather the materials and tools
Set out the supplies before opening the box. The exact list depends on the model and finish, but a built-in-style project generally needs:
- The selected IKEA shelf and its included hardware
- Tape measure, pencil, and level
- Screwdriver or drill that matches the included fasteners
- A stud-finding method appropriate for the wall
- Fine-grit sandpaper
- A clean cloth or tack cloth
- Surface-appropriate primer and paint
- Paintbrush and roller
- Painter’s tape and a drop cloth
- Trim or moulding
- A saw suited to the trim
- Wood filler
- Paintable caulk and caulk gun
- Fasteners and wall anchors selected for the actual wall material
- Shims for an uneven floor
- Safety glasses and hearing protection when cutting
Check the IKEA assembly instructions before substituting hardware. If a panel is damaged or the hardware is missing, contact IKEA customer service rather than forcing the piece together.
Prepare the panels before painting
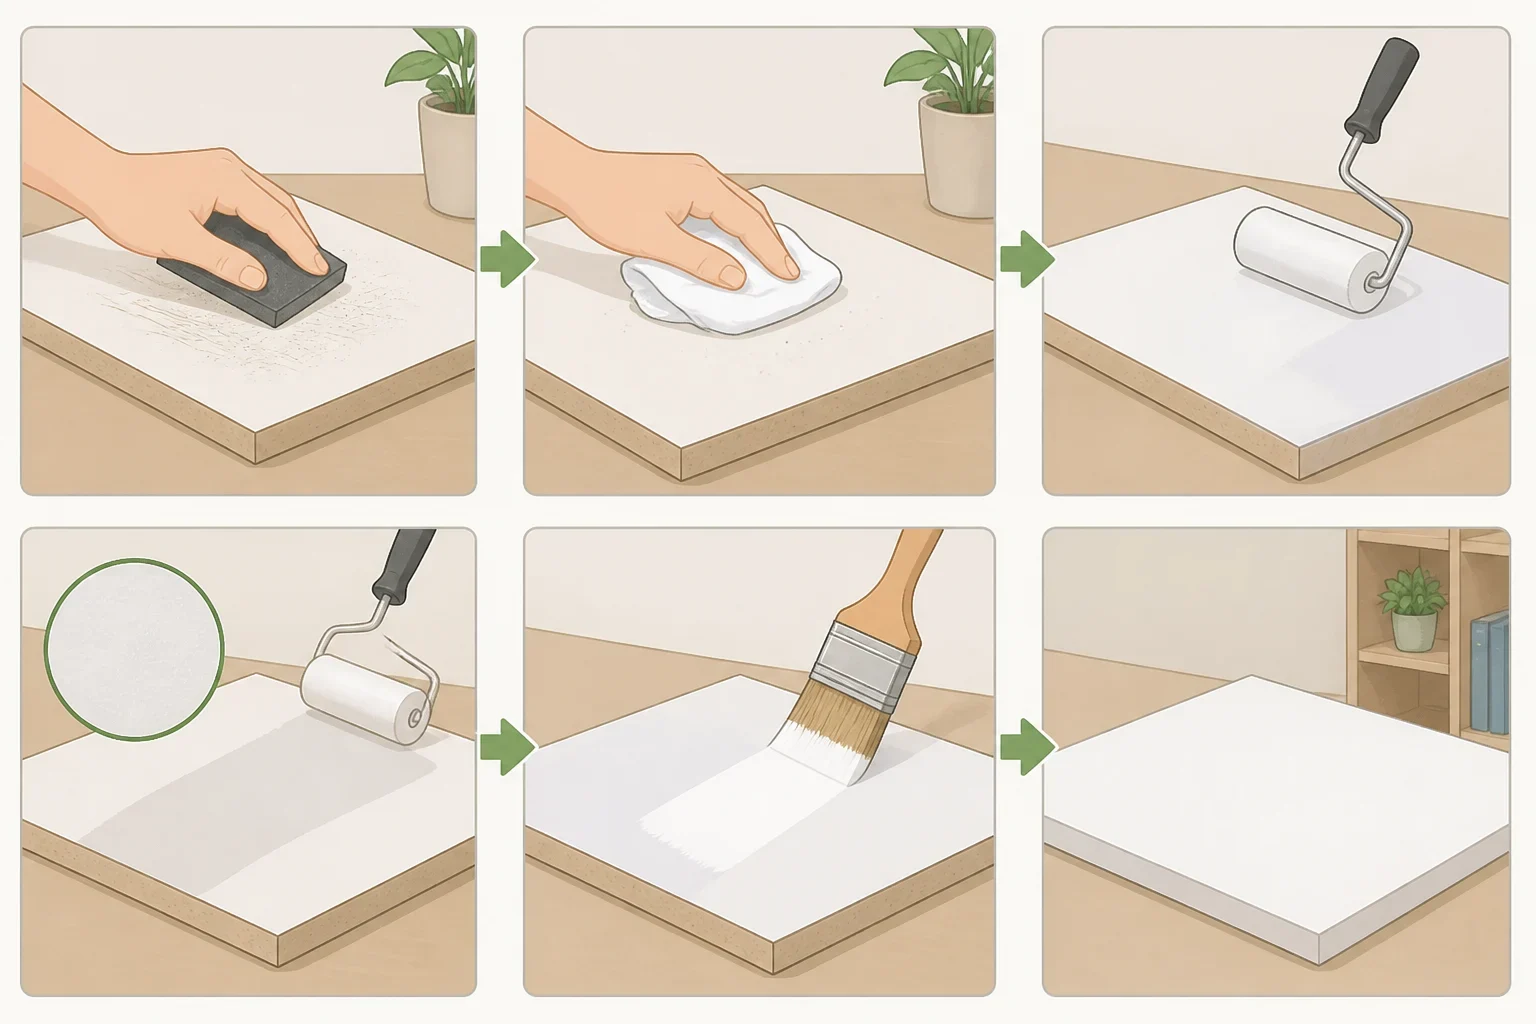
Do not treat every IKEA finish as if it were bare wood. The product’s surface, coating, and care instructions determine how it should be prepared. Read the paint and primer labels, and test the process on an inconspicuous area or leftover section first.
- Clean the panels. Remove dust, residue, and handling grime with a cleaner suitable for the surface. Let the panel dry completely.
- Scuff the surface lightly. Use fine-grit sandpaper to reduce sheen without cutting aggressively into the panel.
- Remove the dust. Wipe with a clean cloth and allow the surface to dry.
- Test adhesion. Apply the intended primer to a small hidden area according to its label. After it dries as directed, test the area gently with a fingernail or a small piece of tape. If the coating lifts easily, stop and choose a surface-compatible product or ask a paint professional.
- Prime the remaining pieces. Follow the primer’s application, ventilation, and drying instructions.
- Apply the topcoat. Use the paint type, sheen, and number of coats recommended for the surface and room. Let each coat dry according to the label before handling the panel.
Painting flat pieces before assembly can make the built-in path easier, especially around edges that will become difficult to reach later. Mark the back of each panel with painter’s tape so the pieces return to their correct positions.
For a furniture-style finish, assembling first may be more convenient, particularly if the unit’s hardware will be hidden or difficult to access after painting. Protect the floor and avoid painting over moving hardware or connection points.
Assemble and level the bookcase
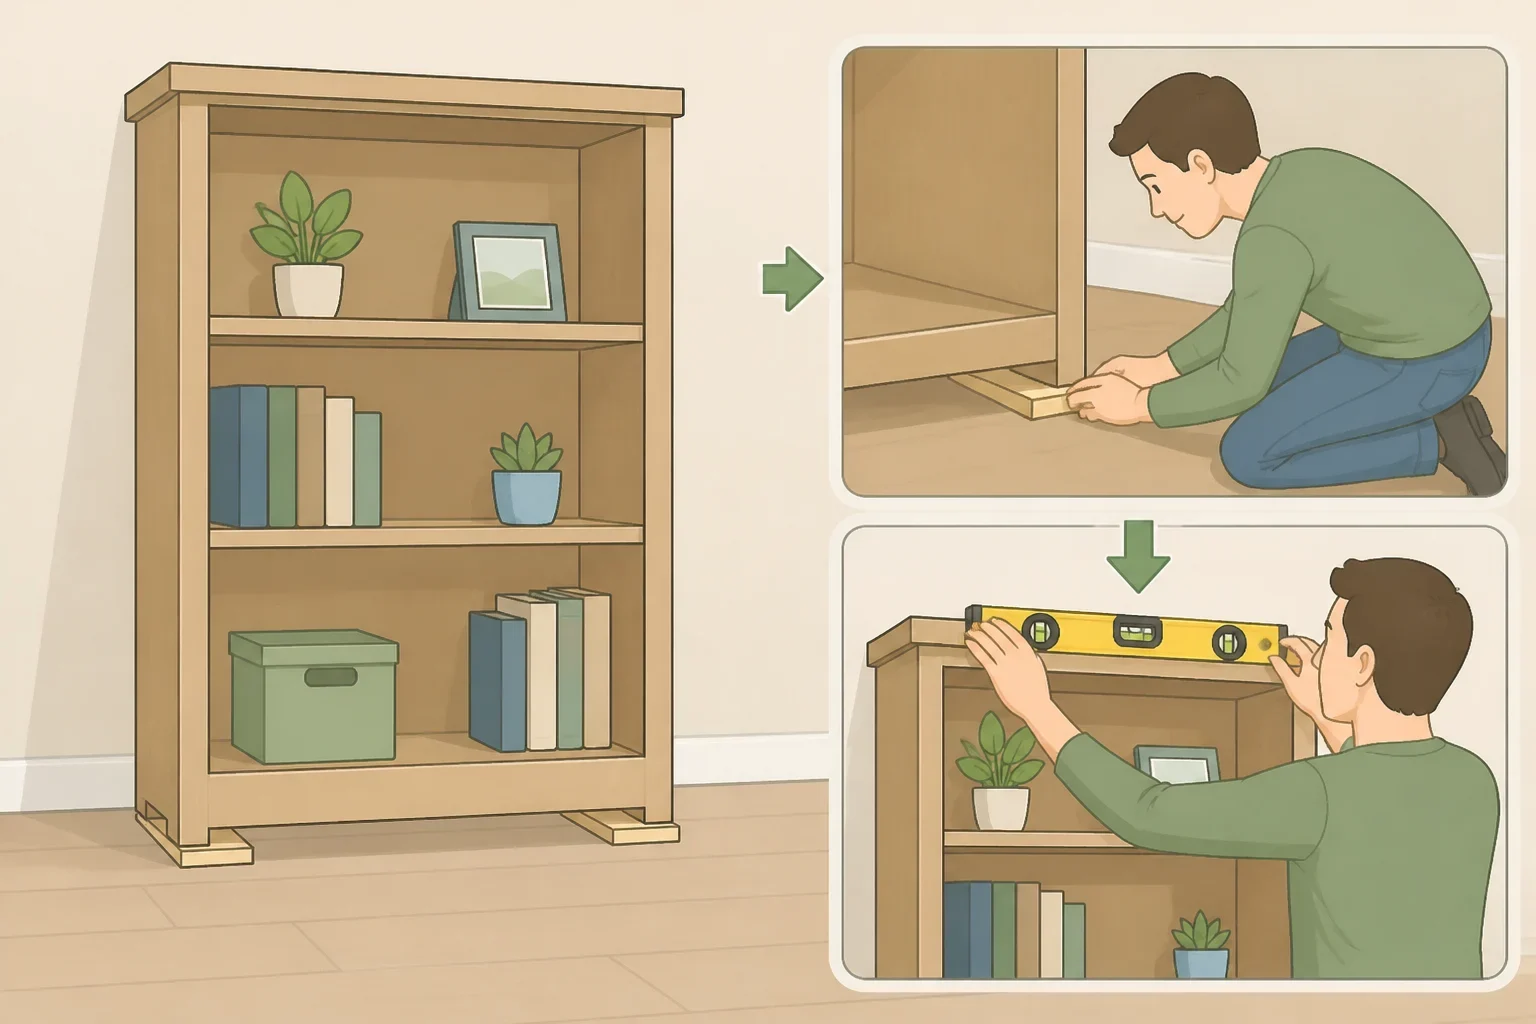
Follow the IKEA instructions for the selected model. Do not improvise if a panel does not align or a fastener does not seat properly. Disassemble the section and check the orientation instead.
Place the assembled unit in its intended location and check it with a level from front to back and side to side. If the floor is uneven, use firm, stable shims designed for the purpose. Position them where they support the unit without stressing or bowing the base. Trim or conceal the visible edge only after the bookcase is stable.
A level shelf gives the trim a better starting point and keeps doors or adjustable components from sitting crooked. It also makes the final empty-unit test more useful. If the case rocks, twists, or pulls away from the wall, stop before adding decorative pieces.
Add trim for the built-in look
Trim should cover a measured gap, not hide a measurement mistake. Hold each piece in place first and mark where it meets the wall, ceiling, baseboard, and bookcase.
- Measure and cut the top and side pieces. Test-fit each piece before attaching it.
- Attach the trim to the bookcase or approved supporting surface. Use fasteners appropriate for the material and keep them clear of shelf hardware.
- Fill visible fastener holes. Let the filler dry, then sand it smooth.
- Caulk small paintable gaps. Use caulk where the trim meets the wall or where a narrow seam needs to be softened. Do not use caulk to bridge a large structural gap.
- Apply the finish. Paint the trim and case in a coordinated color and sheen if the built-in effect is the goal.
Trim can make a shelf look integrated, but it cannot correct a wall that is severely out of square or a unit that is not level. If the gap changes dramatically from top to bottom, pause and reconsider the layout rather than forcing the moulding into place.
Anchor the unit before loading it
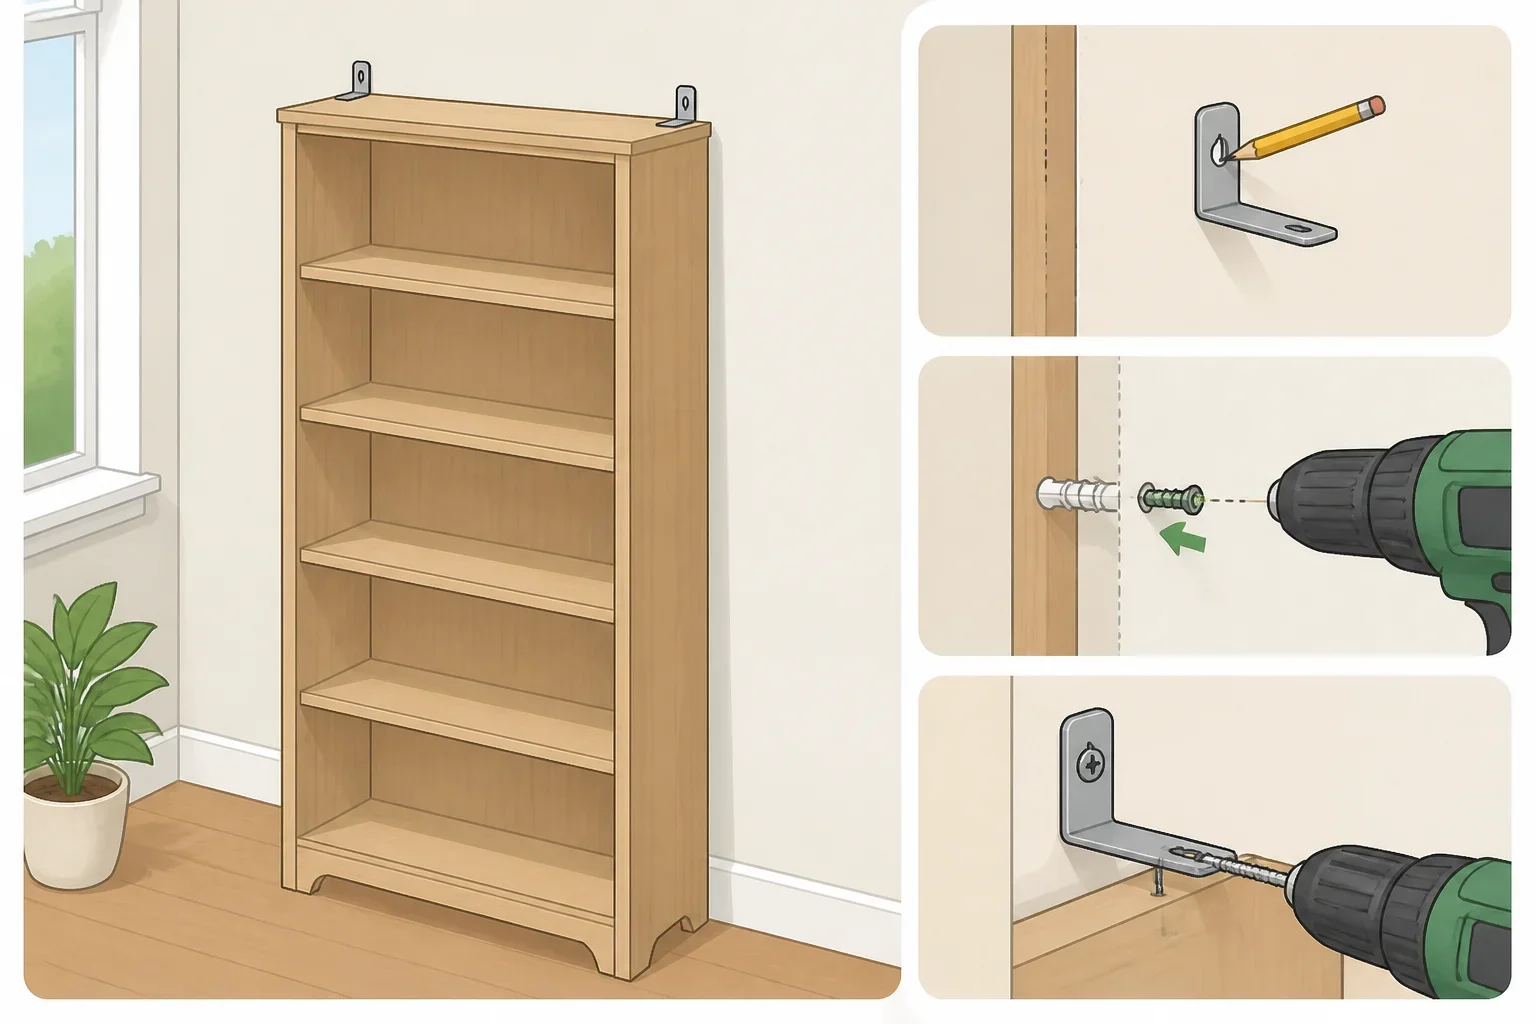
Do not install a tall bookcase until the attachment point, fastener, anchor, and wall material have been identified. Locate a stud when possible, then follow the shelf manufacturer’s instructions for attaching the unit. If there is no suitable stud, select an anchor specifically rated and intended for the actual wall type and expected load.
Drywall, plaster, masonry, and walls with unknown construction do not accept the same fasteners. Do not substitute a generic “heavy-duty” anchor without checking its instructions. If the wall material cannot be identified, pause and ask a qualified professional rather than guessing.
After attachment, test the bookcase empty. Check that it does not rock, pull away from the wall, shift when lightly pushed, or separate at a trim joint. Correct the problem before adding books, baskets, décor, or anything else that increases the load.
Keep heavier items lower and respect the shelf capacity listed for the exact product. If the anchor plan cannot be verified or the case cannot be secured without damaging the unit, choose a shorter or simpler piece, obtain qualified help, or use a different storage solution.
Decide whether the project is a refresh or a built-in
A paint-and-hardware update is enough when the goal is a cleaner standalone piece. Choose the furniture-style route if the lease, wall condition, or available tools make trim and permanent attachment impractical.
A built-in-style installation makes sense when the wall has a clear storage need, the trim can be measured accurately, and the attachment method is appropriate. It still remains a modified IKEA unit, not custom cabinetry. Be honest about that distinction before spending on moulding or cutting into the wall.
The most expensive-looking result usually comes from restraint. Use one finish, keep the trim proportionate to the room, and combine useful storage with a few objects already owned. Architectural Digest reported that Moore’s apartment combined existing furnishings with pieces purchased for the space. That approach works here too: finish the shelf first, then add only what the room needs.
Complete the final safety check
Before calling the project complete, inspect the entire piece:
- Confirm the case is level and stable.
- Check that the wall attachment is tight and suited to the wall material.
- Look for exposed fasteners, sharp trim edges, or loose filler.
- Make sure doors, drawers, or adjustable shelves move freely.
- Test the unit empty one more time.
- Load heavier items low and distribute the rest evenly.
- Keep the product instructions and hardware information for future adjustments.
The practical next step is simple: measure the wall, inspect the baseboard and wall material, and write down the exact IKEA model before buying anything. Once the unit fits the space and the anchoring plan is clear, choose the built-in or furniture-style finish and purchase the remaining materials as one project.
