
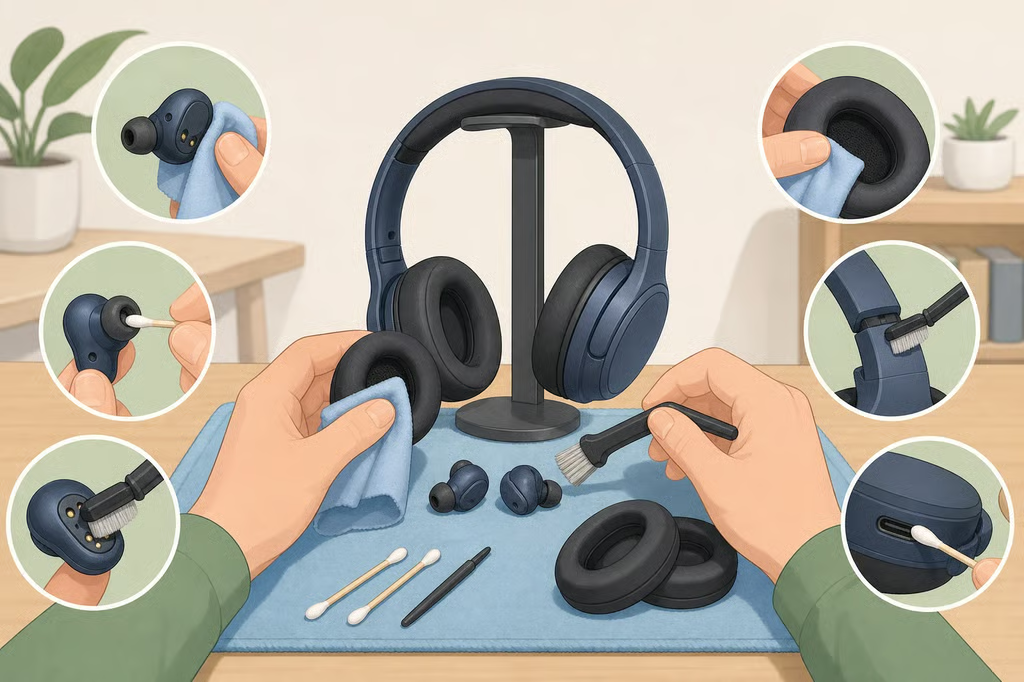
- How to Clean Headphones: A Type-by-Type Guide to Earbuds, AirPods, and Ear Pads
- Gather the right supplies
- Check the headphones before cleaning
- How to clean earbuds and AirPods
- How to remove earwax from earbuds without pushing it inside
- How to clean headphone ear pads and headbands
- Clean headphone mesh, cases, ports, and cables
- Build a simple cleaning routine
How to Clean Headphones: A Type-by-Type Guide to Earbuds, AirPods, and Ear Pads
A quick surface wipe will not remove buildup from headphone mesh, ear tips, charging contacts, or the seams around ear pads. This guide to how to clean headphones explains what to use on each part, how to remove earwax from earbuds without pushing it farther inside, and when to stop cleaning and arrange service.
Headphones collect dust, perspiration, natural oils, and hair products during ordinary use. That buildup can affect comfort, sound quality, and the life of the device, according to Dyson’s headphone cleaning guide. The safest approach is simple: use the least moisture possible, follow the care instructions for the exact model, and never force debris into a mesh opening or charging port.
Gather the right supplies
Set out the supplies before taking the headphones apart:
- A soft, dry, lint-free or microfiber cloth
- A clean, soft-bristled brush
- A soft children’s toothbrush for the model-specific AirPods mesh method
- A small amount of mild, dye-free, fragrance-free dish soap
- Water, or distilled water when the manufacturer’s instructions call for it
- A paper towel
- Two small cups if cleaning AirPods 3, AirPods 4, or AirPods 5 mesh according to Apple’s instructions
Use a separate clean container for any soap solution, and make only enough to complete the job. A damp cloth should not leave droplets behind. Skip sharp tools, abrasive materials, high-pressure air, household cleaners, and solvents. Sonos specifically warns against harsh chemicals and alcohol-based solvents because they may damage a headphone’s finish. (Sonos)
Check the headphones before cleaning
Complete these checks before adding any moisture:
- Power down and unplug the headphones. Water and an active electrical connection are a poor combination. Sonos recommends turning off or disconnecting headphones before every cleaning session. (Sonos)
- Read the instructions for the exact model. AirPods Pro 2 and AirPods Pro 3 have different marked mesh areas, and Samsung’s method is specific to Galaxy Buds4 and Buds4 Pro. A method that works for a removable silicone tip may damage the earbud housing.
- Remove detachable parts. Pull off silicone ear tips or remove over-ear cushions only if the model is designed for it. Set those parts aside so they can be cleaned and dried without wetting the speaker housing.
- Inspect the surfaces. Look for wax on the mesh, debris around charging contacts, peeling or cracked pads, and buildup on touch controls. If the debris is loose, start with a dry brush instead of a damp cloth.
Keep the main device nearly dry. Dyson warns against submerging headphones or exposing them to excess moisture because water can cause short circuits and component failure. High-pressure air can also damage the delicate membranes inside headphones, so gentle manual cleaning is the safer choice. (Dyson)
How to clean earbuds and AirPods
Earbuds need a lighter touch than over-ear headphones. Brush across the surface rather than pressing into it, and never use a pin, toothpick, or other sharp object to dig through mesh.
Clean AirPods 3, AirPods 4, and AirPods 5 mesh
Apple provides a specific method for these AirPods. You will need a soft-bristled children’s toothbrush, micellar water containing PEG-6 Caprylic/Capric Glycerides or distilled water, two small cups, and a paper towel. (Apple Support)
- Dip the toothbrush lightly. Remove excess liquid so the brush is damp, not dripping.
- Hold the AirPod with the mesh facing up. Brush only the mesh, using small circles for about 15 seconds.
- Blot the brush between passes. Use the paper towel to remove loosened debris and excess liquid. Keep the stem, sensors, seams, and other areas dry.
- Repeat the passes two more times. Apple specifies three total passes for each mesh being cleaned.
- Let the AirPods dry completely. Wait at least two hours before placing them in the charging case or using them.
If the AirPods have been exposed to sunscreen, lotion, soap, shampoo, makeup, oil, or another substance that could stain or damage them, wipe the housing with a cloth slightly dampened with fresh water. Follow with a soft, dry, lint-free cloth. Do not run the AirPods under water, and do not use sharp or abrasive materials. (Apple Support)
Clean AirPods Pro 2 mesh
First, remove the silicone ear tips by pulling firmly at the base where each tip attaches. Hold each AirPod with the mesh facing up, then clean only the encircled mesh areas identified in Apple’s AirPods Pro instructions.
Use the soft brush in small circles for about 15 seconds per pass, repeating the process three times. Do not apply this method to unmarked areas, sensors, or the rest of the earbud. Allow the AirPods Pro 2 to dry completely for at least two hours before putting them in the case or using them.
Clean AirPods Pro 3 mesh
Remove the silicone ear tips first. AirPods Pro 3 has its own marked areas, including the bottom microphone mesh. Clean only the encircled meshes shown for that model. Do not assume the bottom microphone area applies to AirPods Pro 2.
Brush with the mesh facing up, using small circles for about 15 seconds per pass. Repeat for three total passes, then allow the AirPods Pro 3 to dry for at least two hours. If debris does not lift easily, stop rather than scrubbing harder.
Rinse removable silicone ear tips
To clean AirPods Pro silicone tips, pull them off and rinse them with plain water. Apple says not to use soap or household cleaners on the tips.
Shake off excess water, dab the tips with a dry, lint-free cloth, and leave them out until they are completely dry. Only then click them back onto the AirPods. If water remains inside a tip, hold the opening downward and tap it gently against a soft, dry, lint-free cloth. (Apple Support)
Clean Galaxy Buds4 and Buds4 Pro
Samsung gives Galaxy Buds4 and Buds4 Pro owners a separate sequence:
- Dip a soft brush into cleansing water.
- Brush each port gently for about 15 seconds.
- Wipe away moisture with a paper towel and repeat the process three times.
- Rinse the brush with distilled water, brush the ports again, and wipe them dry.
- Use a soft, dry cloth on the sensors, touch blades, and charging contacts.
Do not rub the sensor surface forcefully. Samsung warns against alcohol, acetone, and other chemicals, and cautions that sharp objects or excessive force can damage the air duct, speaker, or microphone holes. Debris on the earbud blade may also interfere with touch recognition. Let the earbuds dry completely before use. (Samsung)
For the charging case, check the cradle and contacts for visible debris, then wipe them with a dry cloth. Remove all moisture after using water, and do not assume this Galaxy Buds4 method is appropriate for another earbud model.
How to remove earwax from earbuds without pushing it inside
Start with the earbud switched off and outside its case. Hold the mesh facing upward and use a soft, dry brush to lift wax from the surface. Move across the mesh gently instead of pressing down.
If the manufacturer provides a liquid-cleaning method, follow that method exactly. For AirPods, use the model-specific Apple steps above. For other earbuds, do not improvise with water, alcohol, pins, or sharp tools. Samsung specifically warns that force and sharp objects can damage the air duct, speaker, or microphone holes. (Samsung)
Stop if the wax appears packed inside the opening or does not lift easily. Repeated scrubbing can push debris farther in. If the approved cleaning method does not resolve a sound, touch-control, or microphone problem, arrange service instead of adding more liquid.
How to clean headphone ear pads and headbands
Over-ear cushions absorb sweat and oil, while the speaker sits directly beneath them. Treat the cushions as a separate part.
- Remove the ear cushions. Take them off before applying a solution so moisture cannot reach the speaker underneath.
- Check the material. Microfiber and synthetic leather can be wiped gently with a damp microfiber cloth. Real leather may need a dedicated leather conditioner, but check the headphone’s care instructions first. (Dyson)
- Mix a mild solution if the instructions allow it. Sonos recommends one-quarter teaspoon of mild dish soap in one cup of water for its over-ear cleaning method. Avoid dyed or fragranced soaps. (Sonos)
- Dampen and wring out the cloth. It should be moist enough to lift grime, not wet enough to leave drops. Wipe the cushions, headband, and exterior with light pressure.
- Clean the cushions separately. Keep them away from the exposed speaker and electrical components. Pat them lightly with a towel if needed, then let them air-dry.
- Wait before reattaching them. The cushions should feel dry throughout, including around seams and inside edges.
The cushions are often the first headphone component to show wear because they are softer and experience regular friction. Cleaning will not restore a cushion that is cracked, peeling, misshapen, or unable to hold its structure. Replace it when the model offers a compatible replacement, or ask the manufacturer about service. (Sonos)
Clean headphone mesh, cases, ports, and cables
For over-ear headphone mesh, begin with a dry, soft brush. Keep the brush away from microphones, and do not use compressed or high-pressure air. If the mesh belongs to a removable cushion, follow the care instructions for that cushion’s material rather than wetting the speaker grille.
For AirPods charging ports, use only a clean, dry, soft-bristled brush. Apple says not to insert anything into the ports because the metal contacts can be damaged. Wipe the charging case with a soft, dry, lint-free cloth. If necessary, Apple permits a cloth slightly dampened with isopropyl alcohol for the case exterior, but keep liquid out of the ports and let the case dry. (Apple Support)
That permission applies to the case exterior, not automatically to the earbuds, mesh, sensors, ear pads, or another headphone brand.
Disconnect headphone cables before cleaning them. Wipe the cable with a microfiber cloth, using a silicone-specific cleaning spray only when the manufacturer recommends it. Never submerge a cable. A protective case can be wiped inside and out with a lightly damp microfiber cloth, then left open to dry. (Dyson)
Build a simple cleaning routine
Wipe visible exterior buildup with a clean, lint-free cloth as needed. Sonos suggests a daily lint-free wipe, while Dyson recommends a dry microfiber wipe once a week and airing out ear cushions after use. Apple advises cleaning and drying AirPods after workouts or exposure to sweat, sunscreen, lotion, soap, shampoo, or makeup. (Sonos; Dyson; Apple Support)
These routines are starting points, not a reason to wet headphones every day. Store them in their protective case when possible, and clean them after substances collect on the surfaces.
Before putting everything away, check that removable parts are clean and completely dry, electronics have not been soaked, and nothing has been pushed into mesh or charging contacts. If a cushion remains cracked, peeling, misshapen, or unable to hold its structure, replace it. If an earbud still has a sound or control problem after its approved cleaning method, stop and arrange service.
