
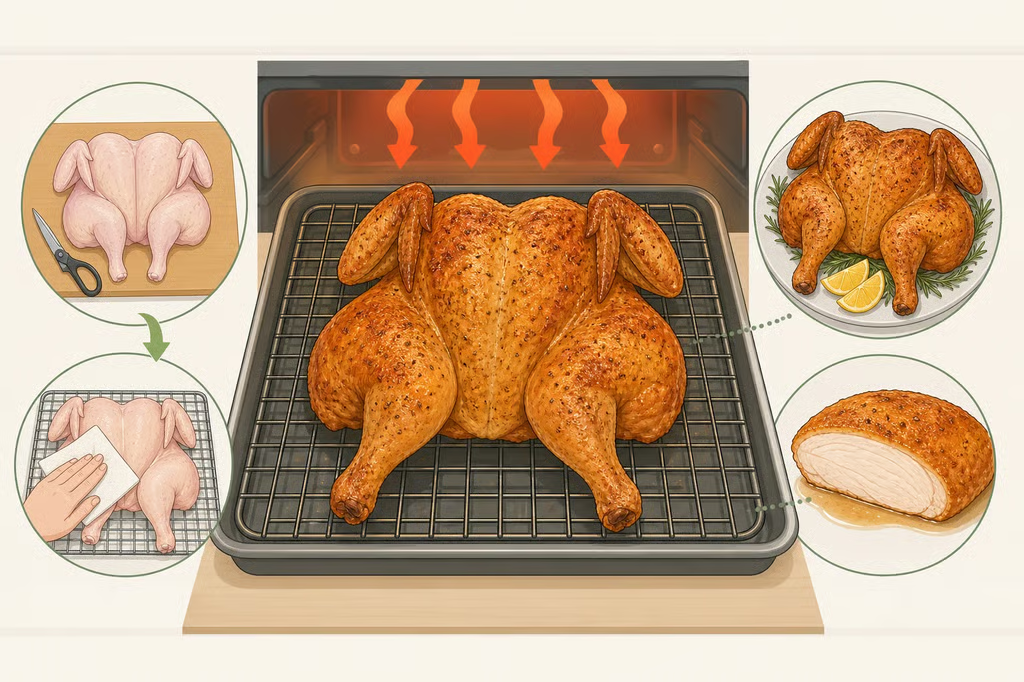
Spatchcock roast chicken recipe: Fix dry breast and crispy skin
Dry breast meat with undercooked thighs usually starts with the bird’s shape, not the seasoning. A trussed chicken keeps the legs tucked close to the body, so the breast can overcook while the thighs catch up. Flattening the chicken spreads the legs into more direct heat and gives the skin a better chance to brown.
This spatchcock roast chicken recipe covers the process from trimming the backbone to checking doneness. The practical starting point is simple: use sturdy kitchen shears, a wire rack, a rimmed baking sheet, and an instant-read thermometer. The oven temperature and timing help, but the thermometer makes the final call.
What to gather before you start
You will need:
- One whole chicken, with the giblets and neck removed
- Neutral-flavored oil, such as canola or vegetable oil
- Kosher salt
- Black pepper
- Paper towels
- Sturdy kitchen shears
- A large cutting board
- A rimmed baking sheet
- A wire rack that fits inside the baking sheet
- An instant-read thermometer
- Aluminum foil for a loose covering
Choose a chicken that fits comfortably on the rack once flattened. The legs should not hang over the edge, and the baking sheet should have enough room to catch the drippings.
A set of sturdy kitchen shears is the main specialized tool required for spatchcocking, according to NYT Cooking, which updated its recipe four months ago. If cutting through the backbone feels awkward, ask a butcher to do it, or look for a bird sold already spatchcocked.
Keep the chicken, shears, cutting board, and their juices away from food that will not be cooked. Wash your hands and clean the work surface as soon as the raw chicken is prepared.
How to spatchcock a chicken for even roasting
1. Remove the backbone
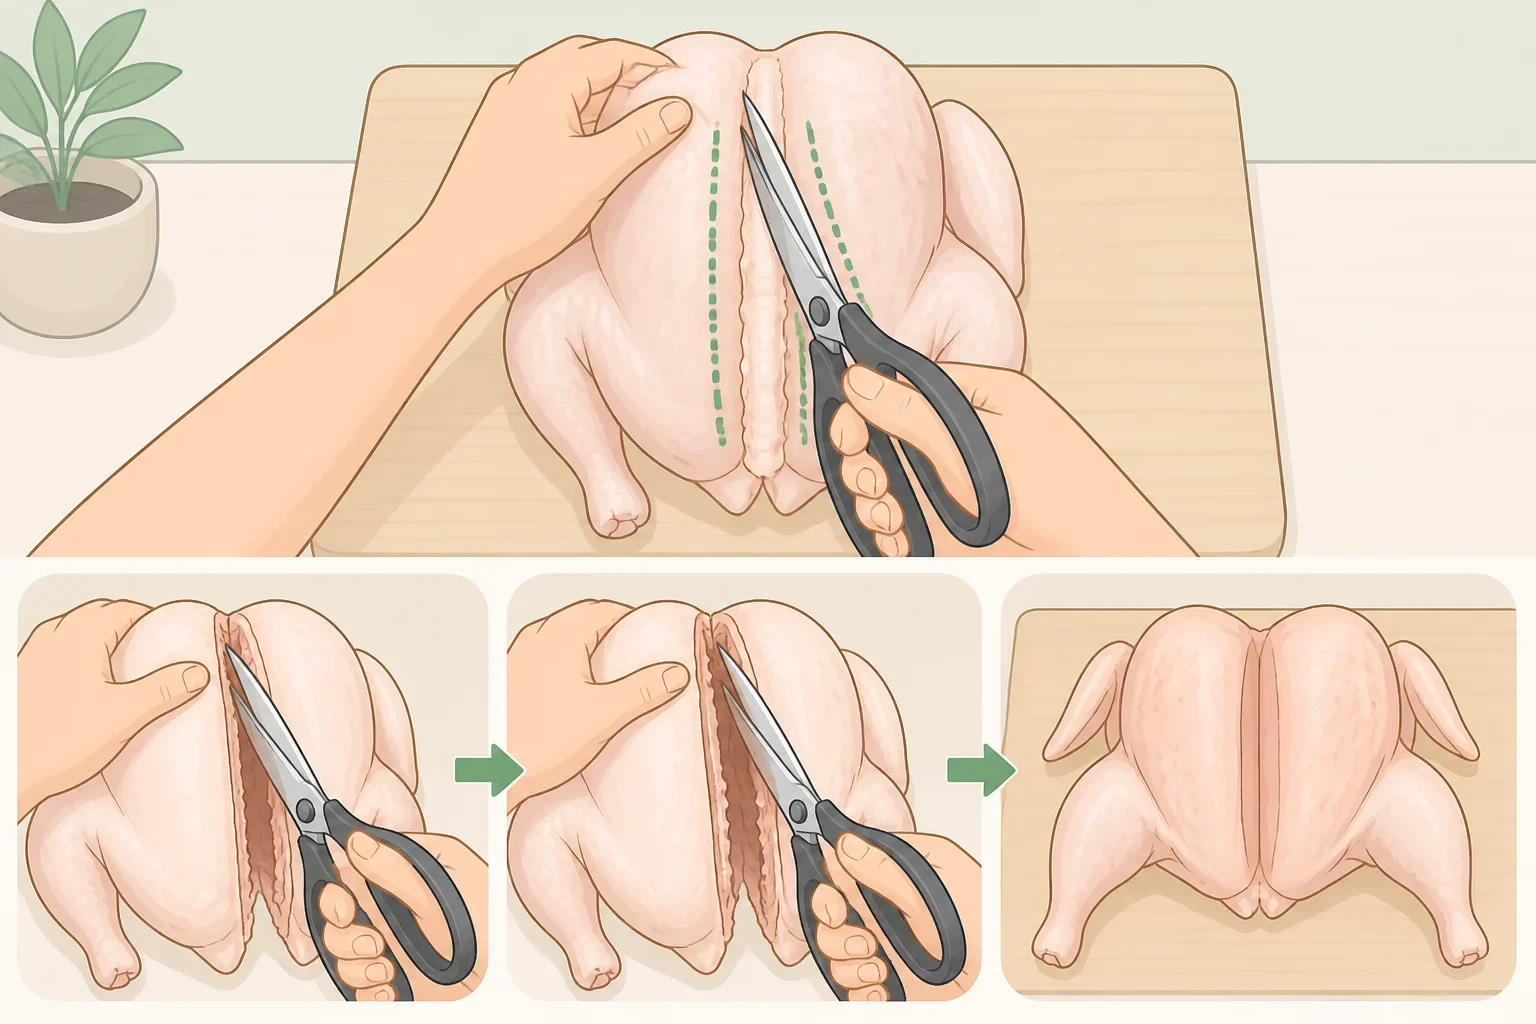
Place the chicken breast-side down on the cutting board, with the legs facing toward you. Find the backbone by running your fingers along the center of the back.
Use the shears to cut down one side of the backbone, starting at the tail end and moving toward the neck. Make a second cut along the other side, then lift out the backbone. The chicken should open more easily once that strip is removed.
Set the backbone aside for another use if desired, or discard it.
2. Flatten the bird
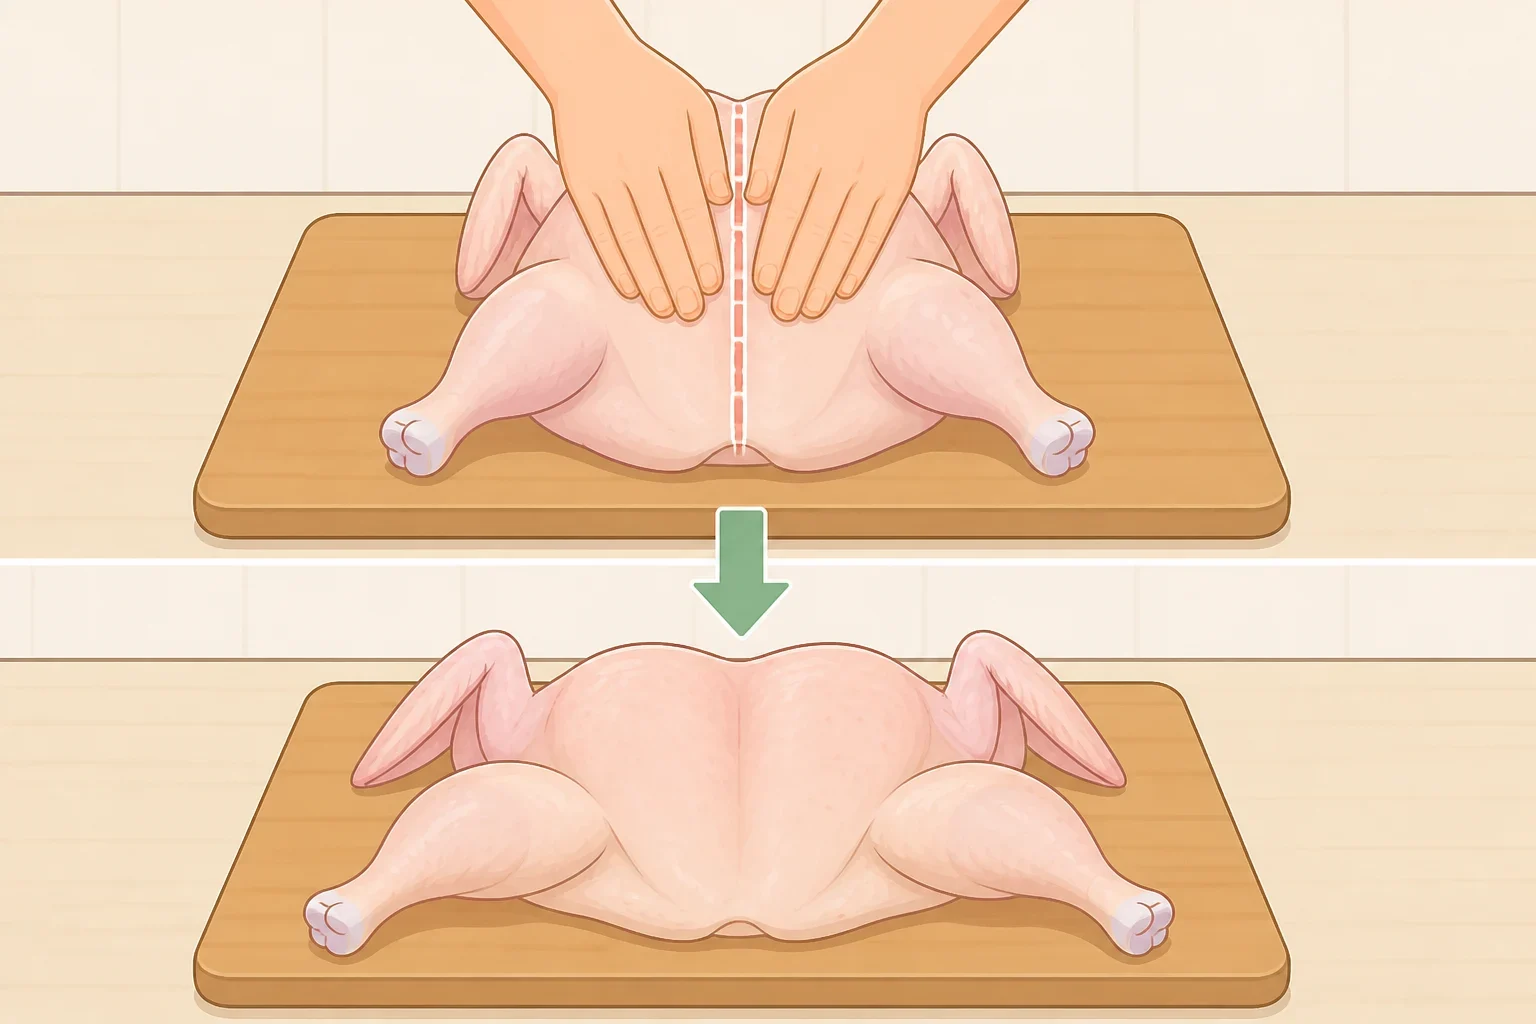
Turn the chicken breast-side up. Press firmly on the breastbone with the heel of your hand until it gives and the bird lies relatively flat.
Perfect symmetry is not necessary. The important change is that the legs and thighs are spread away from the breast instead of tucked underneath it. This is the central benefit of spatchcocking, because a flat chicken gives the legs more direct heat for quicker cooking and better browning.
3. Tuck the wing tips
Fold each wing tip behind the shoulder area. The tips are thin and can darken before the rest of the chicken is ready, so tucking them keeps them out of the strongest heat.
Place the flattened chicken on the rack over the baking sheet while you finish preparing the skin.
Dry and season the chicken
Pat the chicken thoroughly dry with paper towels, including the cavity and the skin around the legs. Damp skin has to lose its surface moisture before it can brown, so this small step is worth taking seriously.
Rub the skin with a thin coat of neutral oil. Sprinkle the chicken generously with salt and pepper, including the cavity. The oil helps the seasoning adhere and gives the skin a light sheen. It should not be covered in a thick, greasy layer.
For a same-day dinner, the chicken can go into the oven after it has been dried and seasoned. If the meal can be planned ahead, salt the bird and refrigerate it uncovered overnight. This dry-brining step gives the salt time to work into the meat while the uncovered refrigerator air dries the skin further. NYT Cooking recommends the overnight uncovered chill for a crisp, well-seasoned result.
Place the chicken on the rack while it chills. If the bird is already on the rack, there is no need to move it again before roasting. Add the oil and pepper just before it goes into the oven if that fits the schedule better.
Roast the chicken at 425°F
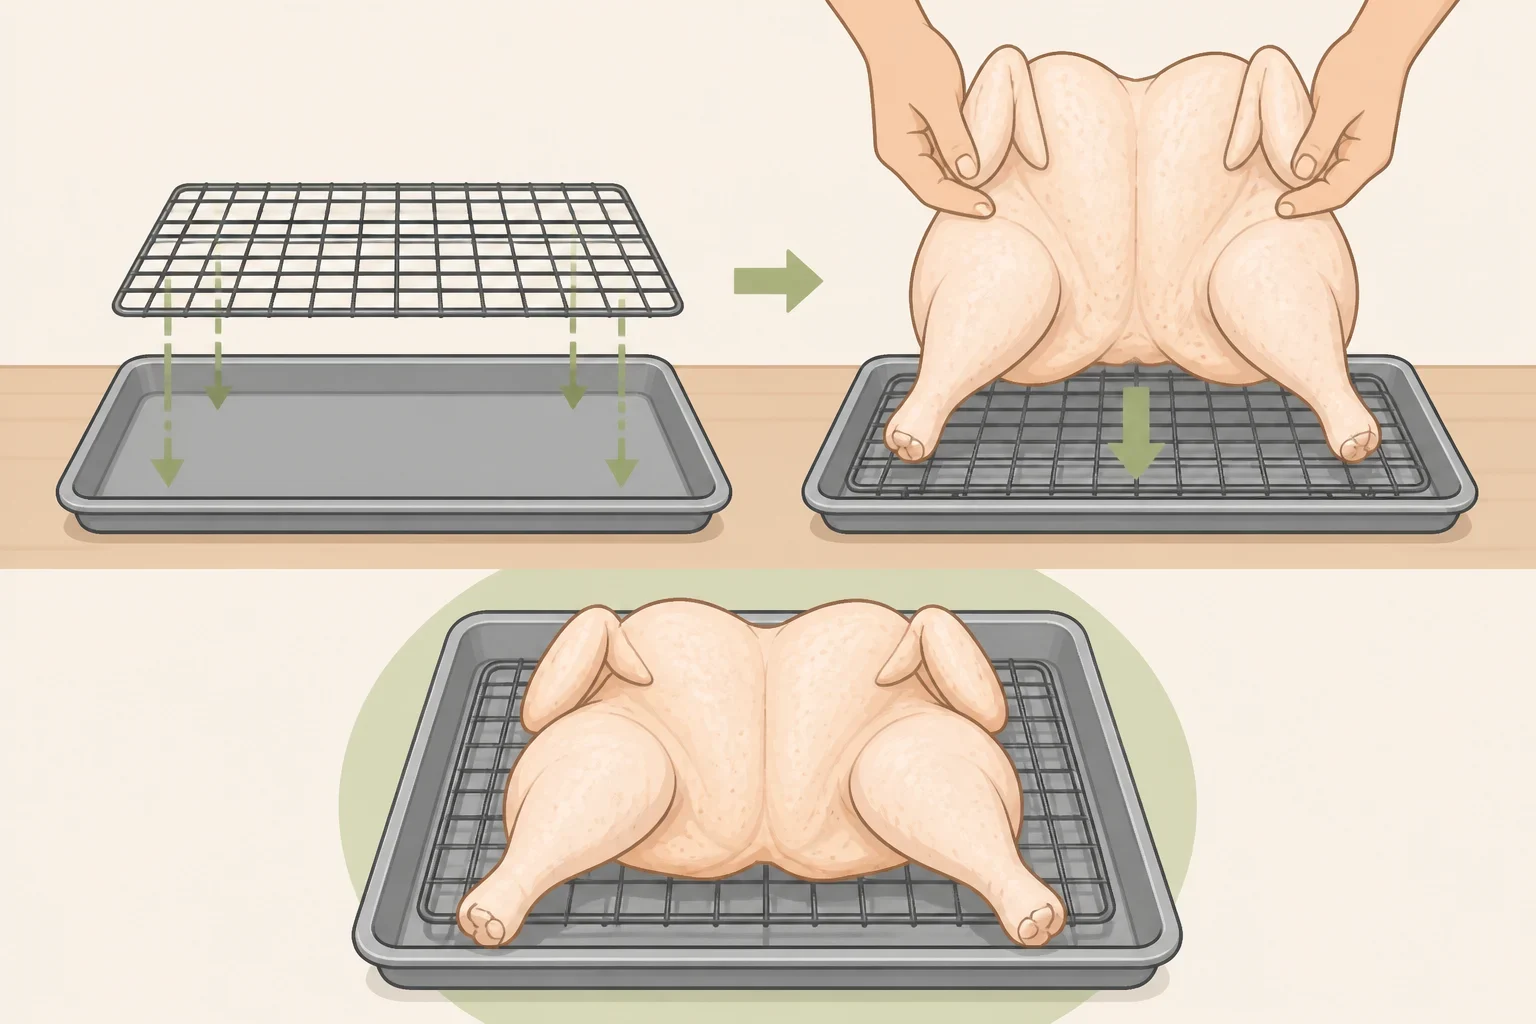
4. Prepare the oven and pan
Move an oven rack to the middle position. Heat the oven to 425°F, the high-heat setting used for this style of roast chicken. The Tasting Table guidance also emphasizes roasting poultry at a sufficiently high temperature and checking the meat with a digital thermometer.
Set the rack inside the rimmed baking sheet. Place the chicken breast-side up, with the legs spread comfortably apart. Check that the bird is stable and that the pan can catch the drippings.
If the oven has a convection setting, standard roasting is a sensible choice. The shape of the chicken, the dry skin, and the internal temperature matter more here than adding extra airflow.
5. Roast until both sections are ready
Slide the pan into the oven and begin checking the chicken as it approaches doneness. A flattened bird may cook at a different pace depending on its size, how evenly it lies on the rack, and how accurately the oven holds its temperature.
Insert the thermometer into the thickest center portion of the breast. Keep the tip in the meat, not the cavity or the breastbone. Then check the thickest part of a thigh, placing the probe near the bone without touching it.
For this method, take the chicken from the oven when the breast reaches about 160°F and the thigh reaches about 175°F. Those targets reflect the roast-chicken guidance cited by Tasting Table. The breast should reach the USDA’s food-safe temperature of 165°F as it finishes cooking during the rest.
Do not judge doneness by skin color alone. A deeply browned bird can still need more time inside, while a lighter-looking bird may already be ready. If a reading seems unexpectedly low, test another spot in the same section. A probe touching bone or sitting in a thin section can give a misleading result.
Rest and carve the bird
6. Rest loosely
Transfer the chicken to a cutting board and cover it loosely with foil. Let it rest for at least 10 minutes before carving. A loose covering keeps the meat warm without trapping as much steam against the skin as a tight wrap would.
Use the resting time to finish a side dish, collect the pan drippings, or set out serving plates. The chicken will be easier to carve once the initial heat has settled.
7. Carve into portions
Start by separating each leg from the breast, cutting through the joint where the thigh meets the body. Divide each leg into a thigh and drumstick if individual portions are preferred.
Next, slice the breast meat away from the breastbone. Cut it crosswise into portions, keeping the crisp skin attached where possible. Arrange the pieces on a platter and spoon the pan drippings over the meat, or reserve them for gravy.
If only part of the chicken is needed, carve those portions and store the remaining cooked meat separately. The leftover meat can be pulled from the bones for sandwiches, salads, or another dinner.
Troubleshoot the most common problems
The skin is browned but not crisp. The chicken may have gone into the oven damp, or it may not have had enough uncovered time in the refrigerator. Pat it dry more carefully next time and use the overnight dry-brine option.
The breast is ready before the thigh. Check that the chicken was pressed flat and that the thighs were not folded beneath the breast. The point of the method is to expose the legs to more direct heat.
The wing tips are too dark. Tuck them behind the shoulders before roasting. Their thin shape makes them quick to brown.
The temperature is low in one section. Test again in the thickest part of the meat, avoiding bone. If the chicken needs more time, return it to the oven and check both the breast and thigh again.
You do not want to remove the backbone. Roast the chicken whole and untrussed at 425°F, then rely on the thermometer rather than appearance. It will not have the same flattened shape, but the meal can still work without the extra cutting step.
The best way to roast a whole chicken for evenly cooked meat is to give the legs room to meet the heat. Flatten the bird, dry and season the skin, roast at 425°F, and check the breast and thigh separately. Use the same-day method for a weeknight dinner, or salt the chicken uncovered overnight when crisp skin and advance planning are worth the refrigerator space.
